
Blog

How to Create a Picture Quiz Using JavaScript
Picture quizzes are a fun way to make a website more interactive. Instead of answering with plain text, users choose an image that matches the question. They work well for educational games, kids’ activities, product identification, visual assessments, and simple learning projects.
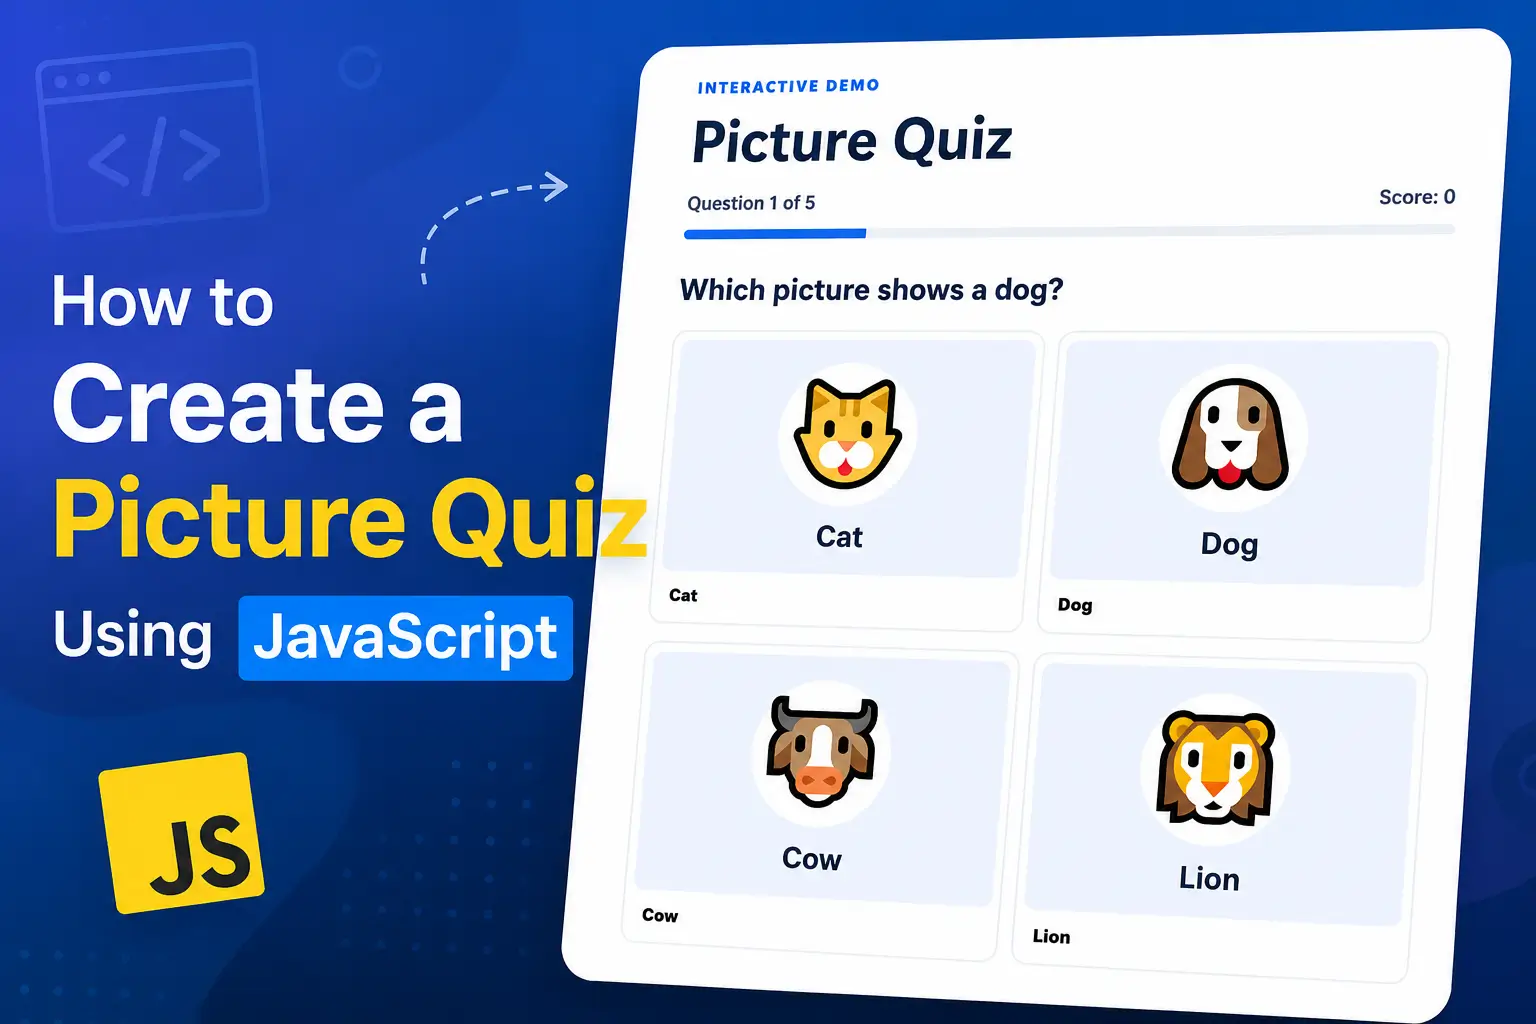
In this tutorial, you will build a modern picture quiz using HTML, CSS, and vanilla JavaScript. The quiz displays image choices, checks the selected answer, tracks the score, shows progress, and displays a final result with a restart button.
The original SanWebCorner example used older JavaScript patterns and a fixed desktop layout. This refreshed version keeps the same useful concept while using modern DOM APIs, responsive CSS, accessible buttons, and a data-driven question array.
What You Will Build
- Image-based multiple-choice questions
- Immediate correct/incorrect feedback
- Score tracking
- Question progress indicator
- Final result screen
- Restart quiz button
- Responsive mobile layout
- No framework or external JavaScript library required
Live Demo
Click Below to view a complete working demo for picture Quiz using javascript without any database.
Project Structure
picture-quiz-demo/
├── index.html
├── style.css
├── script.js
└── assets/
├── dog.svg
├── cat.svg
├── cow.svg
├── lion.svg
├── tiger.svg
├── parrot.svg
├── goat.svg
└── hen.svg
Step 1: Create the HTML
The HTML provides the quiz card, progress information, question area, image choices, feedback message, navigation button, and result screen.
<main class="quiz-shell">
  <section class="quiz-card" aria-labelledby="quiz-title">
    <div class="eyebrow">Interactive Demo</div>
    <h1 id="quiz-title">Picture Quiz</h1>

    <div class="topline">
      <span id="progress">Question 1 of 5</span>
      <span id="score">Score: 0</span>
    </div>

    <div class="progress-track" aria-hidden="true">
      <div id="progressBar" class="progress-bar"></div>
    </div>

    <h2 id="question"></h2>
    <div id="choices" class="choices" role="group" aria-label="Answer choices"></div>
    <p id="feedback" class="feedback" aria-live="polite"></p>
    <button id="nextBtn" class="next-btn" type="button" hidden>Next Question</button>

    <div id="result" class="result" hidden>
      <h2>Quiz Complete!</h2>
      <p id="finalScore"></p>
      <button id="restartBtn" class="next-btn" type="button">Restart Quiz</button>
    </div>
  </section>
</main>
Step 2: Style the Picture Quiz with CSS
CSS Grid creates a two-column image layout on larger screens and switches to one column on smaller screens. The answer buttons also provide visible hover and focus states.
.choices {
  display: grid;
  grid-template-columns: repeat(2, minmax(0, 1fr));
  gap: 16px;
}

.choice {
  background: #fff;
  border: 2px solid #e3e8f0;
  border-radius: 16px;
  padding: 10px;
  cursor: pointer;
}

.choice img {
  width: 100%;
  aspect-ratio: 16 / 10;
  object-fit: cover;
  border-radius: 11px;
}

.choice.correct { border-color: #16a34a; background: #f0fdf4; }
.choice.wrong { border-color: #dc2626; background: #fef2f2; }

@media (max-width: 640px) {
  .choices { grid-template-columns: 1fr; }
}
Step 3: Add Quiz Questions in JavaScript
Store the quiz content in an array of objects. This makes it easy to add, remove, or reorder questions without rewriting the quiz logic.
const questions = [
  {
    text: "Which picture shows a dog?",
    answer: "Dog",
    choices: [
      ["Cat", "assets/cat.svg"],
      ["Dog", "assets/dog.svg"],
      ["Cow", "assets/cow.svg"],
      ["Lion", "assets/lion.svg"]
    ]
  },
  {
    text: "Can you find the lion?",
    answer: "Lion",
    choices: [
      ["Tiger", "assets/tiger.svg"],
      ["Parrot", "assets/parrot.svg"],
      ["Lion", "assets/lion.svg"],
      ["Goat", "assets/goat.svg"]
    ]
  }
];
Step 4: Render Each Question
The render function reads the current question, updates the progress and score, and creates a button for each image choice.
function render() {
  const item = questions[index];
  question.textContent = item.text;
  progress.textContent = `Question ${index + 1} of ${questions.length}`;
  scoreEl.textContent = `Score: ${score}`;
  choices.replaceChildren();

  item.choices.forEach(([label, src]) => {
    const button = document.createElement("button");
    button.className = "choice";
    button.type = "button";
    button.innerHTML = `<img src="${src}" alt="${label}"><span>${label}</span>`;
    button.addEventListener("click", () => select(button, label));
    choices.append(button);
  });
}
Step 5: Check the Selected Answer
When the user selects an image, disable the choices, highlight the correct answer, update the score when necessary, and show a short feedback message.
function select(button, label) {
  if (answered) return;
  answered = true;
  const item = questions[index];

  document.querySelectorAll(".choice").forEach((btn) => {
    btn.disabled = true;
    if (btn.querySelector("span").textContent === item.answer) {
      btn.classList.add("correct");
    }
  });

  if (label === item.answer) {
    score++;
    feedback.textContent = "Correct! Great job.";
  } else {
    button.classList.add("wrong");
    feedback.textContent = `Not quite. The correct answer is ${item.answer}.`;
  }
}
Step 6: Show the Final Score
After the last question, hide the question choices and display the final score. The restart button resets the question index and score so the quiz can be played again.
function showResult() {
  question.hidden = true;
  choices.hidden = true;
  result.hidden = false;
  finalScore.textContent = `You scored ${score} out of ${questions.length}.`;
}

restartBtn.addEventListener("click", () => {
  index = 0;
  score = 0;
  render();
});
How to Add More Picture Quiz Questions
Add another object to the questions array. Each question needs question text, the correct answer label, and an array of image choices.
{
  text: "Which picture shows a rabbit?",
  answer: "Rabbit",
  choices: [
    ["Rabbit", "assets/rabbit.jpg"],
    ["Dog", "assets/dog.jpg"],
    ["Cat", "assets/cat.jpg"],
    ["Goat", "assets/goat.jpg"]
  ]
}
Keep the answer value exactly the same as the matching choice label. Also add meaningful alt text or labels for every image so the quiz is understandable beyond visual appearance alone.
Why Use Vanilla JavaScript for This Quiz?
A small quiz does not require a framework. Vanilla JavaScript keeps the example lightweight and makes the core logic easier to understand. The same data-driven approach can later be adapted to React, Vue, a CMS, or an API-backed application.
Accessibility and Mobile Tips
- Use real <button> elements for answer choices so keyboard users can select them.
- Provide useful alt text for every quiz image.
- Use aria-live for feedback that changes after an answer.
- Do not rely only on red and green; include text feedback such as “Correct” or “Not quite.”
- Keep touch targets large enough for phones and tablets.
- Respect reduced-motion preferences if you add animations later.
Frequently Asked Questions
Can I create a picture quiz using only JavaScript?
JavaScript handles the quiz behavior, but HTML is used for structure and CSS is used for presentation. No JavaScript framework is required.
How do I add images to quiz answers in JavaScript?
Store an image path with each answer choice, then create an <img> element or image markup when rendering the choices.
How do I calculate the quiz score?
Start a score variable at zero and increment it whenever the selected answer matches the correct answer.
Can I add more than five questions?
Yes. Add more question objects to the questions array. The progress and final score use the array length automatically.
Does this picture quiz work on mobile devices?
Yes. The responsive CSS changes the image-choice grid to a single column on smaller screens.
Do I need jQuery for this quiz?
No. The example uses modern vanilla JavaScript DOM APIs and event listeners.
Conclusion
You now have a modern picture quiz built with HTML, CSS, and vanilla JavaScript. The data-driven structure makes it easy to replace the sample animals with products, landmarks, flags, educational images, or any other visual question set.
For the complete working version, use the downloadable source package included with this tutorial. It contains the HTML, CSS, JavaScript, and local demo images, so it can run without the retired demos.sanwebcorner.com site.
Download Source Code
Download the Picture Quiz Using JavaScript source ZIP from the article and extract it on your computer. Open index.html to run the demo locally. You can then replace the sample images and edit the questions array in script.js.